Published
- 10 min read
Optimizing Custom Image Classification Models for Browser-Based Inference

Intro
I’ll be sharing my attempt in creating a custom image classification model that runs entirely in the browser, allowing users of my map directory app to automatically categorize uploaded images—all without taxing server resources or incurring high costs.
By leveraging browser-based machine learning, I’m able to keep my current $6/month VPS plan, while also achieving efficient, almost real-time classification.
The Challenge
My app required a solution to classify user-uploaded images into 3 categories: Vibes (interior and exterior), Food & Drinks, and Menu.
The primary constraints were:
- Limited server resources: Operating on a modest $6/month VPS.
- Need for real-time processing: Ensuring a seamless user experience.
- Cost-efficiency: Minimizing expenditures on cloud services or infrastructure.
These factors led me to explore browser-based machine learning, shifting computational tasks to the user’s device and avoiding server-side processing altogether.
Exploring Pre-trained Models
The first step was to investigate existing pre-trained models. I began by exploring MobileNet V2, which was pre-trained on the ImageNet dataset consisting of 1.3 million images across 1000 categories. Although accurate, it doesn’t meet my specific criteria of classifying between 3 classes I’ve mentioned. Mapping these 1000 categories into my target classes could produce unexpected results—for instance, an image could be classified as “food” regardless if it’s a photo or a digital illustration of a food. This could lead to maintenance challenges, as I would need a middle layer between the model and the final classification result.
These limitations made me consider training a custom model tailored specifically to my needs. Training a model from scratch, especially with only three classes, may lead to a smaller model and improved accuracy, and faster inference times.
Training a Custom Model
Going in, I have no idea which tools I can use train an image classification model. I stumbled upon Ultralytics YOLOv8, in particular this nifty tutorial from the Computer Vision Engineer YouTube channel. YOLO offers a simple and straightforward approach to training classification models. I like simple and straightforward, so I went with this tool.
Data Preparation
I organized my dataset into three folders: train, val, and test. Each contained subfolders for my three classes: vibes, food_and_drinks, and menu. Initially, I used:
- Train: 300 images per class
- Validation: 100 images per class
- Test: 100 images per class
.png)
Training Process
To train the model, I used the following command:
yolo classify train data = "C:\Users\PC\Desktop\MLv2" epochs = 10 imgsz = 64This process created two PyTorch files: best.pt (best performing epoch) and last.pt (final epoch).
Let’s see how it does.
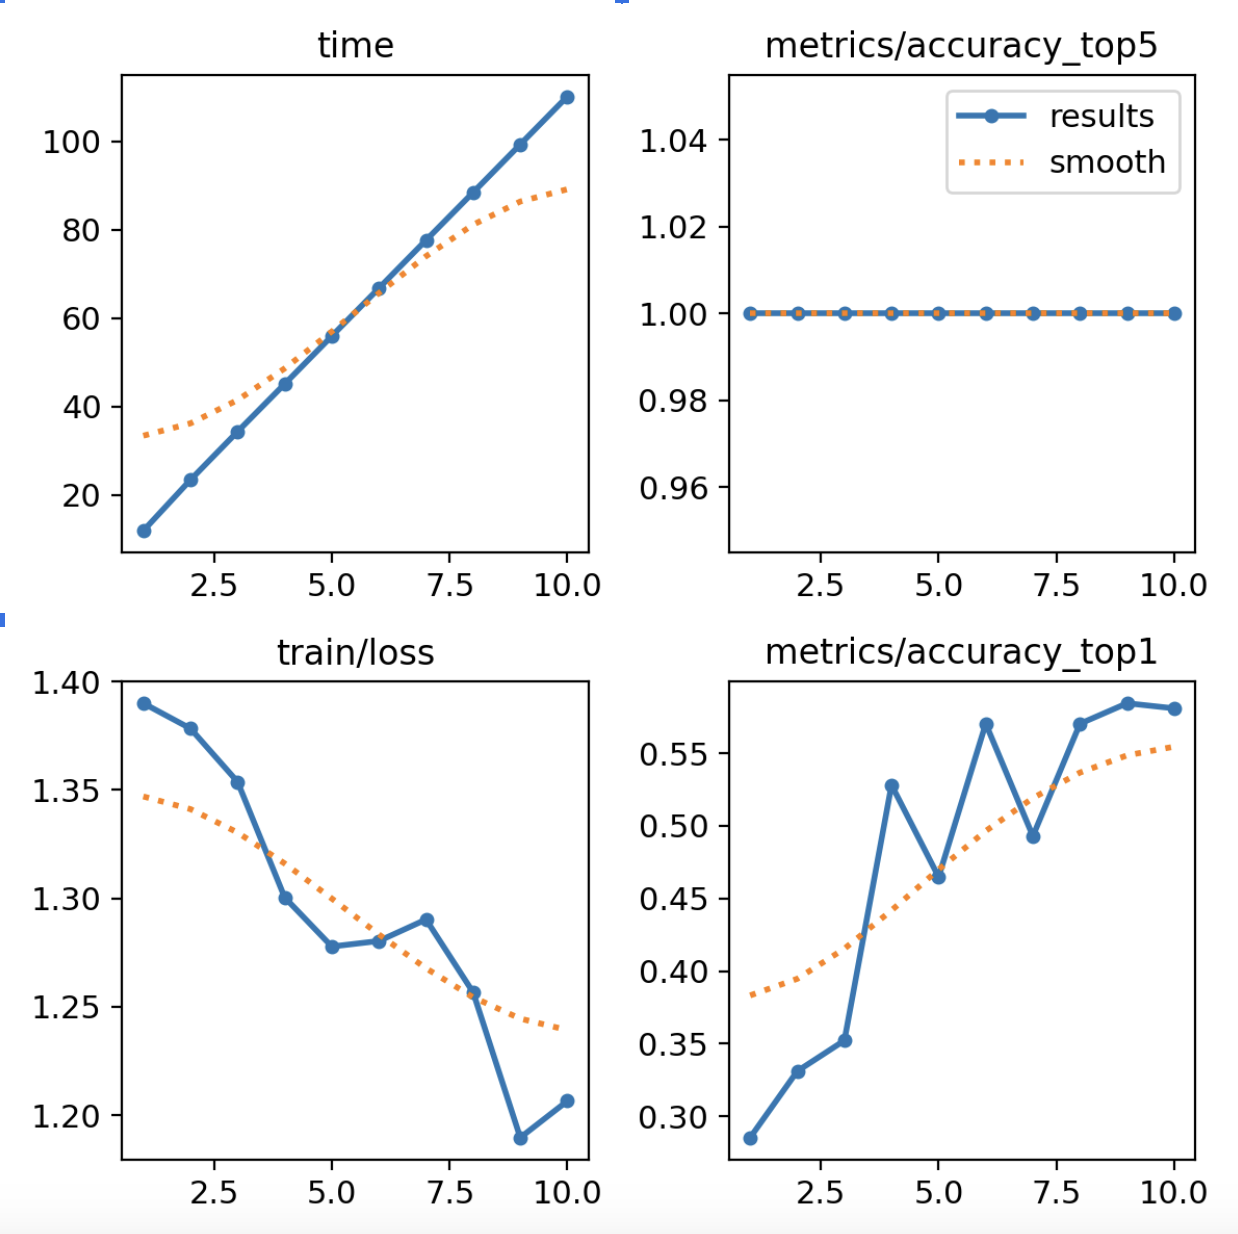
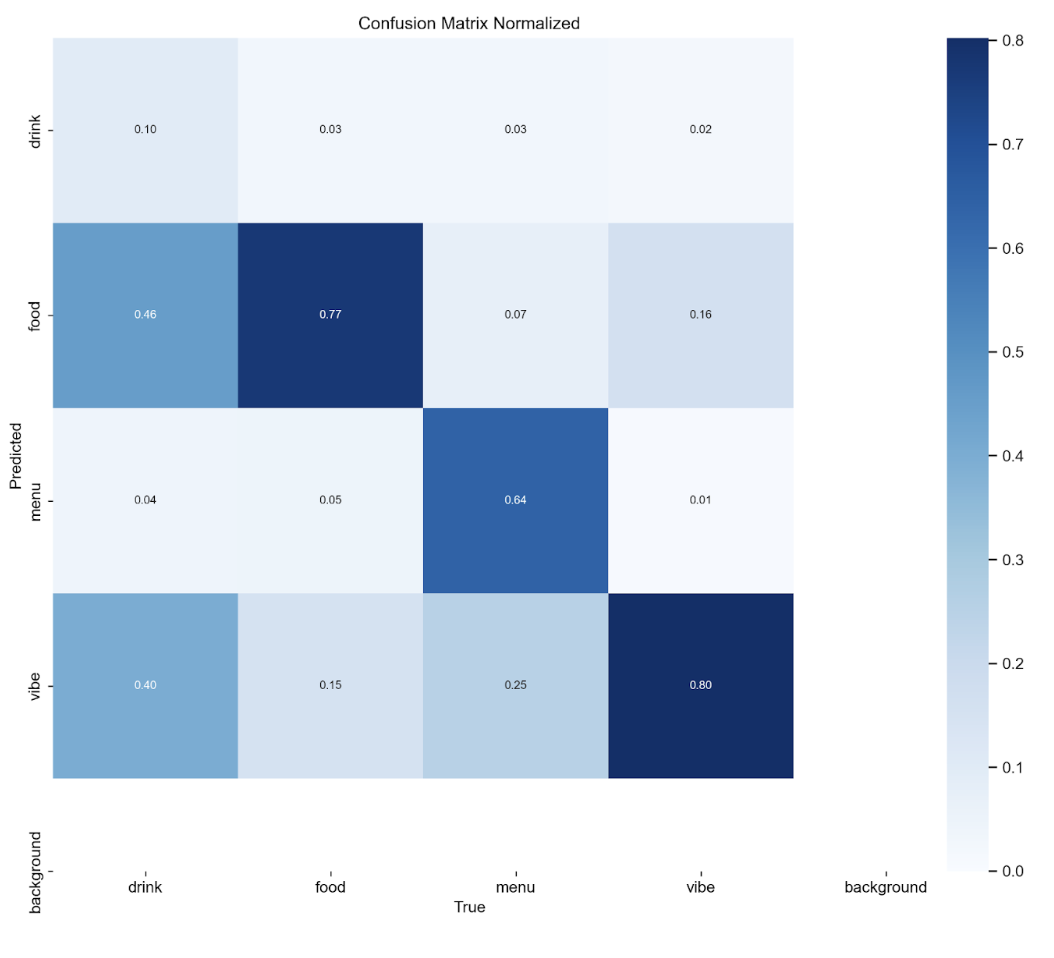
The top-1 accuracy was a little above 55%, which was only marginally better than random guessing.
Optimizing the Model
I built a makeshift HTML-based project to test the model’s predictions. The initial accuracy was clearly inadequate. Several approaches helped increase the model’s performance:
Adding More Data
With only 300 training images per class, the dataset was insufficient. I expanded it to around 750 images per class, which significantly improved the model’s learning capacity.
Increasing Epocs
Analyzing the accuracy graph over epochs revealed that it hadn’t plateaued, indicating the need for more training iterations. I increased the number of epochs to 50, ensuring the model had enough time to properly learn.
Diversifying the Dataset
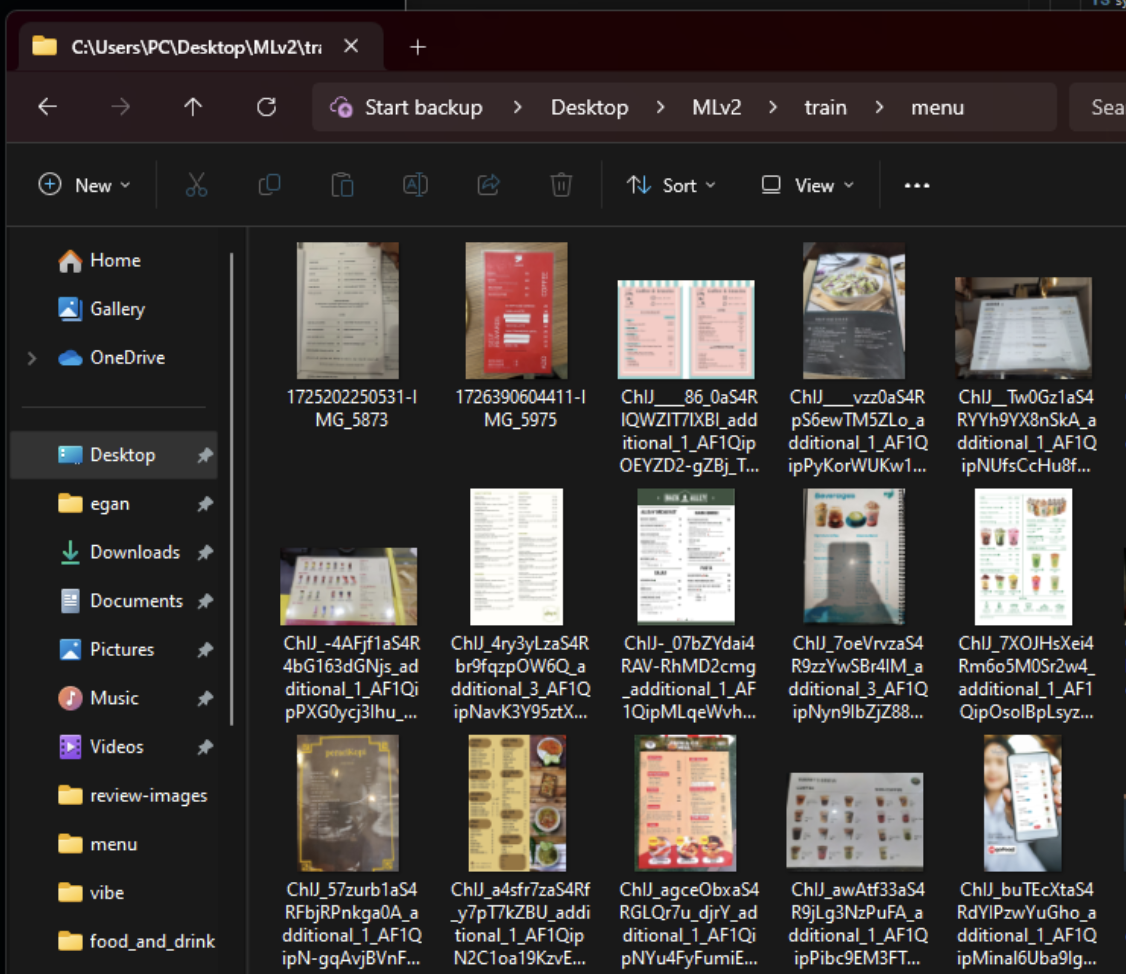
To prevent overfitting, I diversified the dataset. For example, there were too many digital menu images, which led to poor performance on photographed menus. Adding a variety of photo types improved the model’s generalizability.
Increasing training image size
The initial training resized images to 64x64 pixels, which resulted in loss of crucial details. I increased the training image size to 320x320, which yielded better results.
2. Transfer Learning with Pretrained Models
Instead of starting from scratch, I incorporated a pretrained model. The pretrained model was already adept at recognizing general features from millions of images. This allowed me to fine-tune the model on my custom dataset, which could lead to better results as it didn’t have to learn all the visual features from zero.
Another Training Attempt
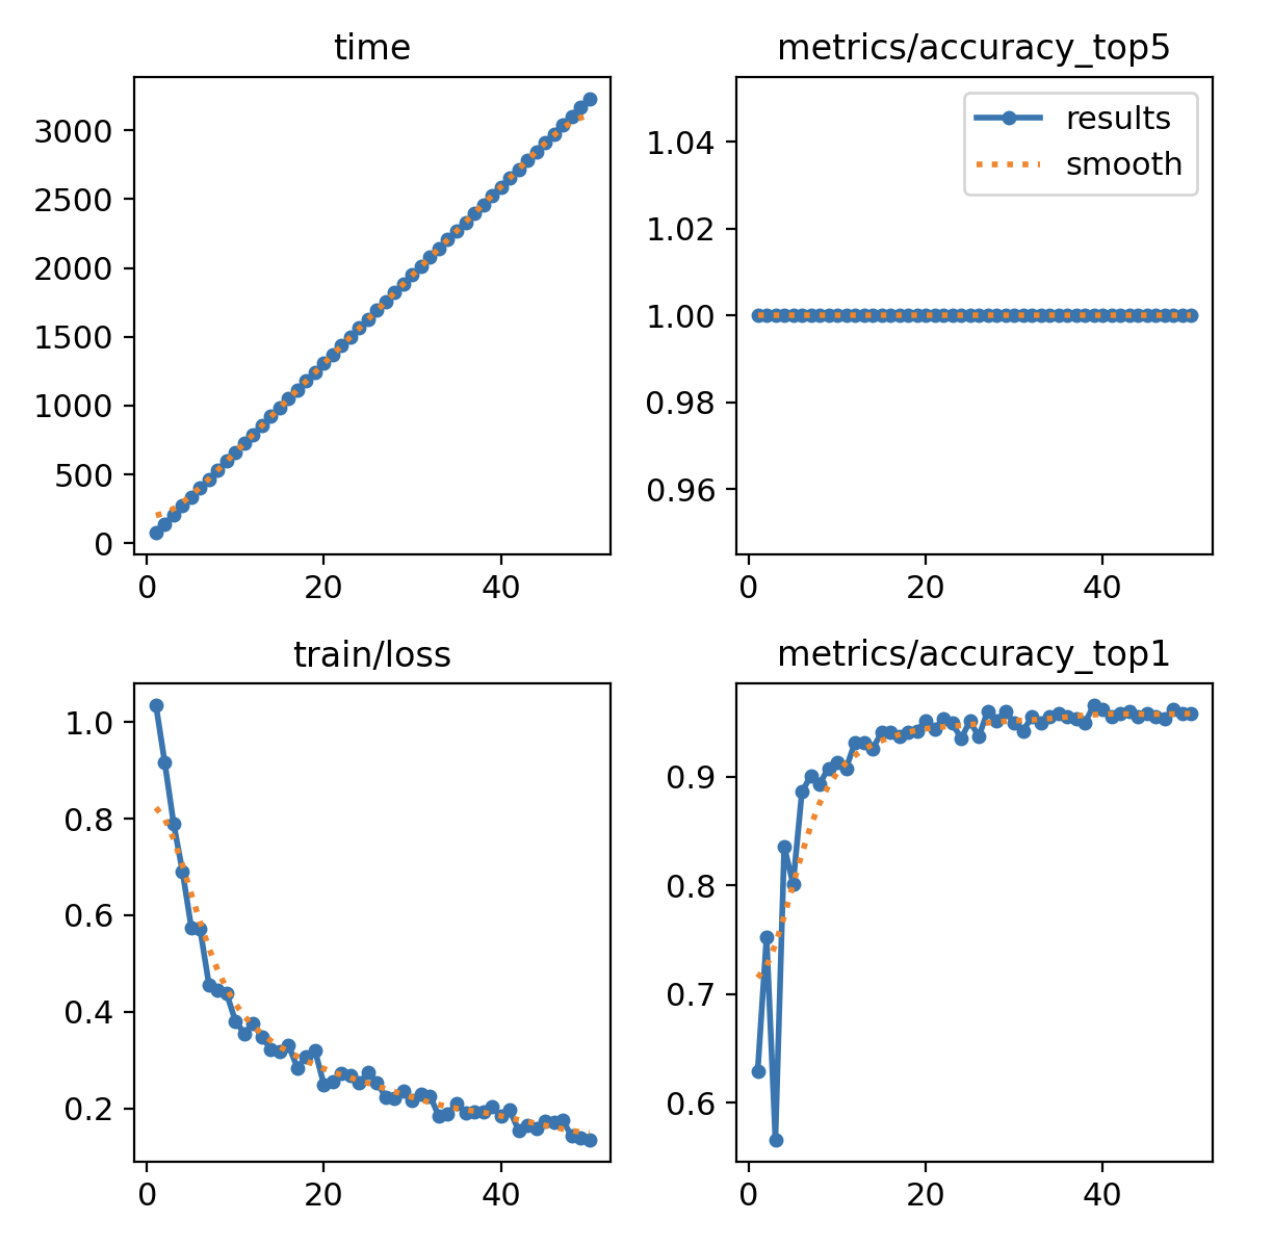
After a few rounds of training with different settings and dataset, I’ve gotten to increase the model accuracy. Here are the final settings:
yolo classify train data = "C:\Users\PC\Desktop\MLv2" model = yolo11n-cls.yaml epochs = 50 imgsz = 320- Epochs: 50
- Dataset
- training: 700 per category
- validation: 100 per category
- testing: 100 per category
- image size: 320x320
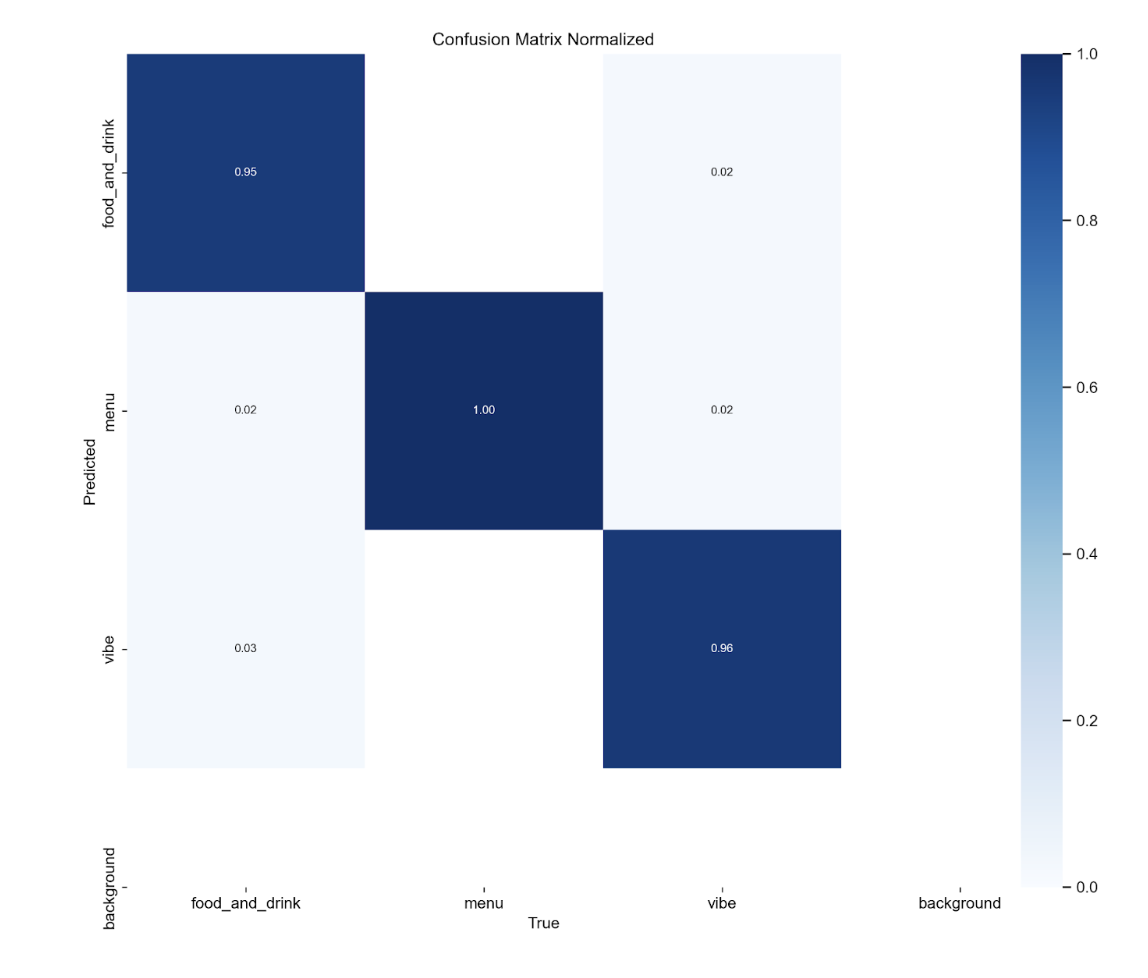
Results and Performance Metrics
After optimization, the performance metrics improved significantly
Optimizing the Model for Web
After training, I needed to optimize the model for web deployment. Thankfully, YOLOv8 provides a super convenient export function:
yolo export format = "tfjs" --imgsz 320 --half TrueThis command exports the model to TensorFlow.js format, optimized for 320x320 image inputs. The half flag enables half-precision quantization, reducing model size and potentially speeding up inference on supported hardware. The final model size is 3.12 MB.
Implementing ML Inference on the Web
Implementing the model in a web environment presented several challenges and opportunities for optimization:
1. Using TensorFlow.js
TensorFlow.js allowed the model to run in the browser, making it more accessible and performant. I also considered ONNX Runtime Web, which could be an option for future exploration.
2. WASM Engine for TensorFlow
To further optimize performance, I utilized the WebAssembly (WASM) backend:
       //kopimap/components/lib/model-worker.ts

import * as tf from '@tensorflow/tfjs'
import '@tensorflow/tfjs-backend-wasm'
import { setWasmPaths } from '@tensorflow/tfjs-backend-wasm'

setWasmPaths('https://cdn.jsdelivr.net/npm/@tensorflow/tfjs-backend-wasm@4.21.0/dist/')

await tf.setBackend('wasm')
await tf.ready()
Here’s a snippet on whether to use WASM backend, taken from docs for @tensorflow/tfjs-backend-wasm:
When should I use the WASM backend?
You should always try to use the WASM backend over the plain JS backend since it is strictly faster on all devices, across all model sizes. Compared to the WebGL backend, the WASM backend has better numerical stability, and wider device support. Performance-wise, our benchmarks show that:
For medium-sized models (~100-500M multiply-adds), the WASM backend is several times slower than the WebGL backend.For lite models (~20-60M multiply-adds), the WASM backend has comparable performance to the WebGL backend (see the Face Detector model above).
We are committed to supporting the WASM backend and will continue to improve performance. We plan to follow the WebAssembly standard closely and benefit from its upcoming features such as multi-threading.
3. Web Workers
To prevent inference from blocking the main browser thread, I used Web Workers:
       // kopimap/components/image-upload.tsx

const workerRef = (useRef < Worker) | (null > null)

// In useEffect:
workerRef.current = new Worker(new URL('./lib/model-worker.ts', import.meta.url), {
	type: 'module'
})

// Send messages to the worker:
workerRef.current.postMessage({
	type: 'runPrediction',
	imageData,
	fileId: file.id
})
4. Model Loading
To improve user experience, I implemented asynchronous model loading:
       // kopimap/components/image-upload.tsx

const [modelLoading, setModelLoading] = useState(true)

// In the Web Worker:
model = await tf.loadGraphModel('path/to/model.json')

isSetupComplete = true
self.postMessage({ type: 'modelLoaded' })
5. Handling Prediction Results
Once the model returned predictions, I updated the file metadata with classification results:
       // kopimap/components/image-upload.tsx

uppy.setFileMeta(file.id, {
	...file.meta,
	classification: bestPrediction.className
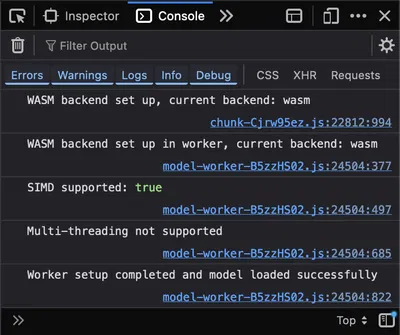
})
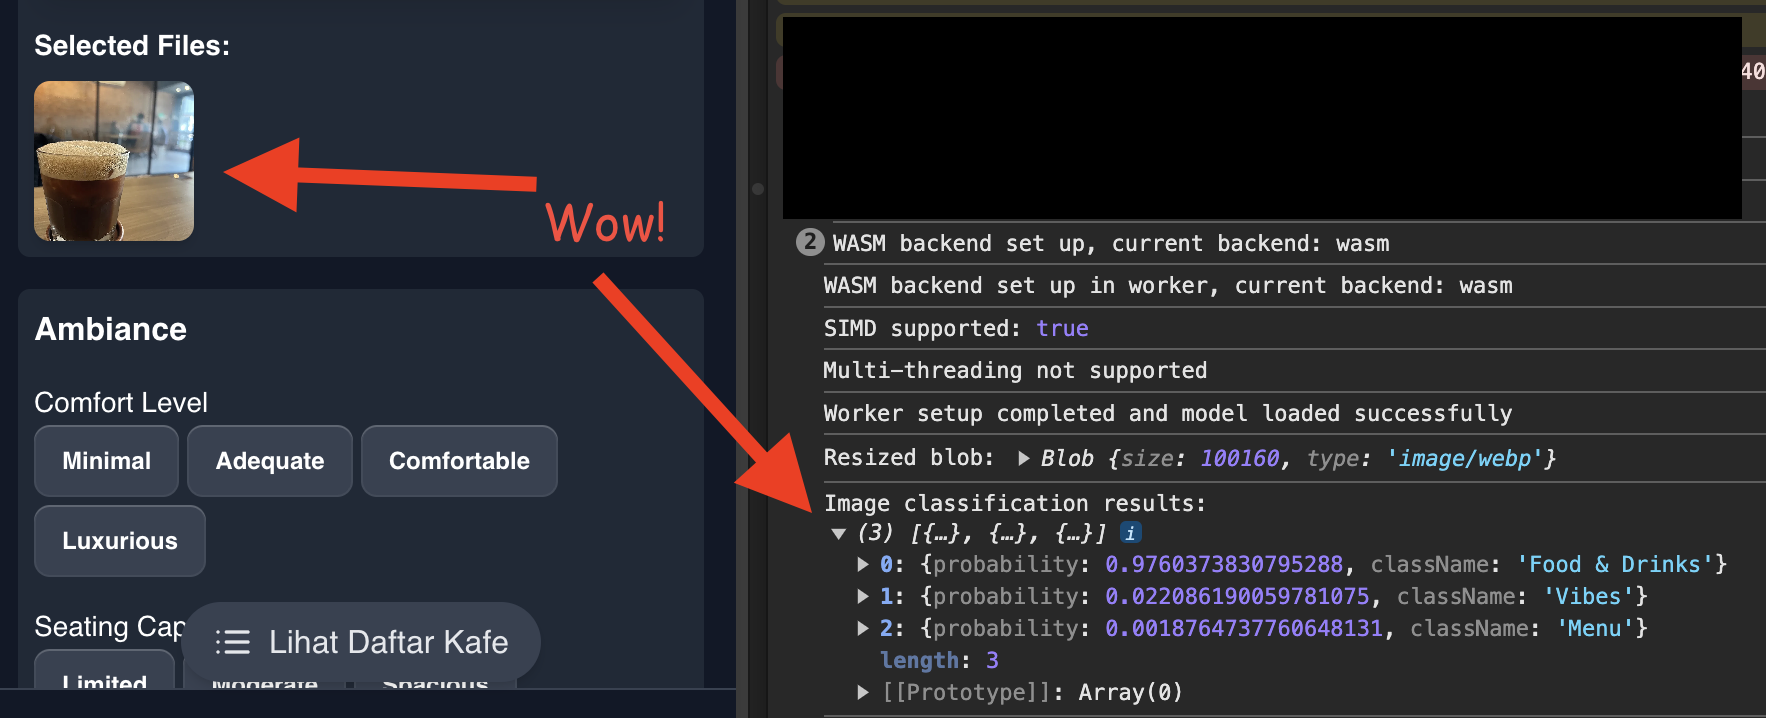
Here is the full model-worker.ts code and the relevant snippet on my image upload component:\
       //kopimap/components/lib/model-worker.ts

import * as tf from '@tensorflow/tfjs'
import '@tensorflow/tfjs-backend-wasm'
import { setWasmPaths } from '@tensorflow/tfjs-backend-wasm'

const CLASS_NAMES = ['Food & Drinks', 'Menu', 'Vibes']

let model: tf.GraphModel | null = null
let isSetupComplete = false

async function setupWorkerAndLoadModel() {
	if (isSetupComplete) {
		console.log('Worker setup and model loading already completed. Skipping initialization.')
		return
	}

	try {
		setWasmPaths('https://cdn.jsdelivr.net/npm/@tensorflow/tfjs-backend-wasm@4.21.0/dist/')
		await tf.setBackend('wasm')
		await tf.ready()

		console.log('WASM backend set up in worker, current backend:', tf.getBackend())

		const simdSupported = await tf.env().getAsync('WASM_HAS_SIMD_SUPPORT')
		console.log('SIMD supported:', simdSupported)

		model = await tf.loadGraphModel(
			'https://kopimap-cdn.b-cdn.net/ml-models/best_web_model/model.json',
			{
				requestInit: {
					mode: 'cors',
					credentials: 'omit'
				}
			}
		)

		if (await tf.env().getAsync('WASM_HAS_MULTITHREAD_SUPPORT')) {
			console.log('Multi-threading supported')
		} else {
			console.log('Multi-threading not supported')
		}

		isSetupComplete = true
		console.log('Worker setup completed and model loaded successfully')
		self.postMessage({ type: 'modelLoaded' })
	} catch (error) {
		console.error('Error setting up worker or loading model:', error)
		self.postMessage({ type: 'setupError', error: (error as Error).message })
	}
}

async function runPrediction(imageData: ImageData) {
	if (!model) {
		throw new Error('Model not loaded')
	}

	const tensor = tf.browser
		.fromPixels(imageData)
		// Resize to 320x320
		.resizeBilinear([320, 320])
		.expandDims()
		.toFloat()
		.div(255.0)

	const predictions = (await model.predict(tensor)) as tf.Tensor
	const probabilities = await predictions.data()

	tensor.dispose()
	predictions.dispose()

	const topPredictions = Array.from(probabilities)
		.map((prob, i) => ({ probability: prob, className: CLASS_NAMES[i] }))
		.sort((a, b) => b.probability - a.probability)
		.slice(0, 3)

	return topPredictions
}

self.onmessage = async (event: MessageEvent) => {
	if (event.data.type === 'loadModel') {
		await setupWorkerAndLoadModel()
	} else if (event.data.type === 'runPrediction') {
		try {
			const prediction = await runPrediction(event.data.imageData)
			self.postMessage({ type: 'predictionResult', prediction })
		} catch (error) {
			console.error('Prediction error:', error)
			self.postMessage({ type: 'predictionError', error: (error as Error).message })
		}
	}
}
// kopimap/components/image-upload.tsx
...
useEffect(() => {
async function setupWasm() {
try {
setWasmPaths(
"https://cdn.jsdelivr.net/npm/@tensorflow/tfjs-backend-wasm@4.0.0/dist/"
);
await tf.setBackend("wasm");
await tf.ready();
console.log("WASM backend set up, current backend:", tf.getBackend());
} catch (error) {
console.error("Error setting up WASM backend:", error);
toast.error(
"Failed to set up image processing. Some features may not work."
);
}
}
setupWasm().then(() => {
if (!workerRef.current) {
workerRef.current = new Worker(
new URL("./lib/model-worker.ts", import.meta.url),
{ type: "module" }
);
workerRef.current.onmessage = (event) => {
if (event.data.type === "modelLoaded") {
setModelLoading(false);
processQueue();
} else if (event.data.type === "setupError") {
toast.error("Failed to load the image classification model.");
setModelLoading(false);
} else if (event.data.type === "predictionResult") {
const { prediction, fileId } = event.data;
console.log("Image classification results:", prediction);
// Update the file metadata with the prediction
uppy.setFileMeta(fileId, {
...uppy.getFile(fileId)?.meta,
classification: prediction,
});
} else if (event.data.type === "predictionError") {
toast.error("An error occurred during image classification.");
}
};
workerRef.current.postMessage({ type: "loadModel" });
}
});
return () => {
workerRef.current?.terminate();
};
}, []);
const processQueue = () => {
while (classificationQueue.current.length > 0) {
const { file, resolve } = classificationQueue.current.shift()!;
runPrediction(file).then(resolve);
}
};
const runPrediction = async (file: ExtendedUppyFile) => {
if (!workerRef.current) {
console.warn("Worker not initialized");
return null;
}
const fileData = file.data as File;
const img = new Image();
img.src = URL.createObjectURL(fileData);
await new Promise((resolve) => (img.onload = resolve));
const canvas = document.createElement("canvas");
canvas.width = img.width;
canvas.height = img.height;
const ctx = canvas.getContext("2d");
ctx?.drawImage(img, 0, 0);
const imageData = ctx?.getImageData(0, 0, img.width, img.height);
return new Promise((resolve) => {
if (workerRef.current) {
const messageHandler = (event: MessageEvent) => {
if (event.data.type === "predictionResult") {
console.log("Prediction result:", event.data.prediction);
resolve(event.data.prediction);
workerRef.current?.removeEventListener("message", messageHandler);
} else if (event.data.type === "predictionError") {
console.error("Prediction error:", event.data.error);
resolve(null);
workerRef.current?.removeEventListener("message", messageHandler);
}
};
workerRef.current.addEventListener("message", messageHandler);
workerRef.current.postMessage({
type: "runPrediction",
imageData,
fileId: file.id,
});
} else {
resolve(null);
}
});
};
const resizeImage = async (file: File): Promise<Blob> => {
const img = new Image();
img.src = URL.createObjectURL(file);
await new Promise((resolve) => (img.onload = resolve));
const aspectRatio = img.width / img.height;
let newWidth = img.width;
let newHeight = img.height;
if (newWidth > MAX_WIDTH) {
newWidth = MAX_WIDTH;
newHeight = newWidth / aspectRatio;
}
if (newHeight > MAX_HEIGHT) {
newHeight = MAX_HEIGHT;
newWidth = newHeight * aspectRatio;
}
const canvas = document.createElement("canvas");
canvas.width = newWidth;
canvas.height = newHeight;
await pica.resize(img, canvas, {
unsharpAmount: 160,
unsharpRadius: 0.6,
unsharpThreshold: 1,
});
return new Promise((resolve) => {
canvas.toBlob((blob) => {
resolve(blob!);
}, file.type);
});
};
useUppyEvent(uppy, "file-added", async (file: ExtendedUppyFile) => {
let prediction;
if (!modelLoading) {
prediction = await runPrediction(file);
} else {
prediction = await new Promise((resolve) => {
classificationQueue.current.push({ file, resolve });
});
}
const bestPrediction = (
prediction as { probability: number; className: string }[]
)?.find((p) => p.probability > 0.7);
if (bestPrediction) {
uppy.setFileMeta(file.id, {
...file.meta,
classification: bestPrediction.className,
});
}
onFilesSelected([file]);
});
...Hosting
Initially, I hosted the model weights on Cloudflare R2. During this time, the model loading often took as long as 5 minutes, which was far too long. With my limited ML knowledge, I initially assumed that I needed to further optimize the model itself to reduce loading times. However, after some investigation, I realized the real issue was network latency rather than the model’s complexity.
The solution was simple: switch to a different CDN that provided better network performance. By choosing a more suitable CDN, I was able to drastically reduce load times, resulting in a much faster and more seamless user experience.
Limitations & Future Work
- Model Size: The model size still feels large in a web app context (3.12 MB)
- Model Inaccuracies: The model tends to provide false positive results if an image doesn’t fit any of the classification categories.
- Inference Speed on Low-end Devices: Performance may vary across devices. Exploring ONNX Runtime Web or further backend optimizations could improve inference times, like multithreading support